背景
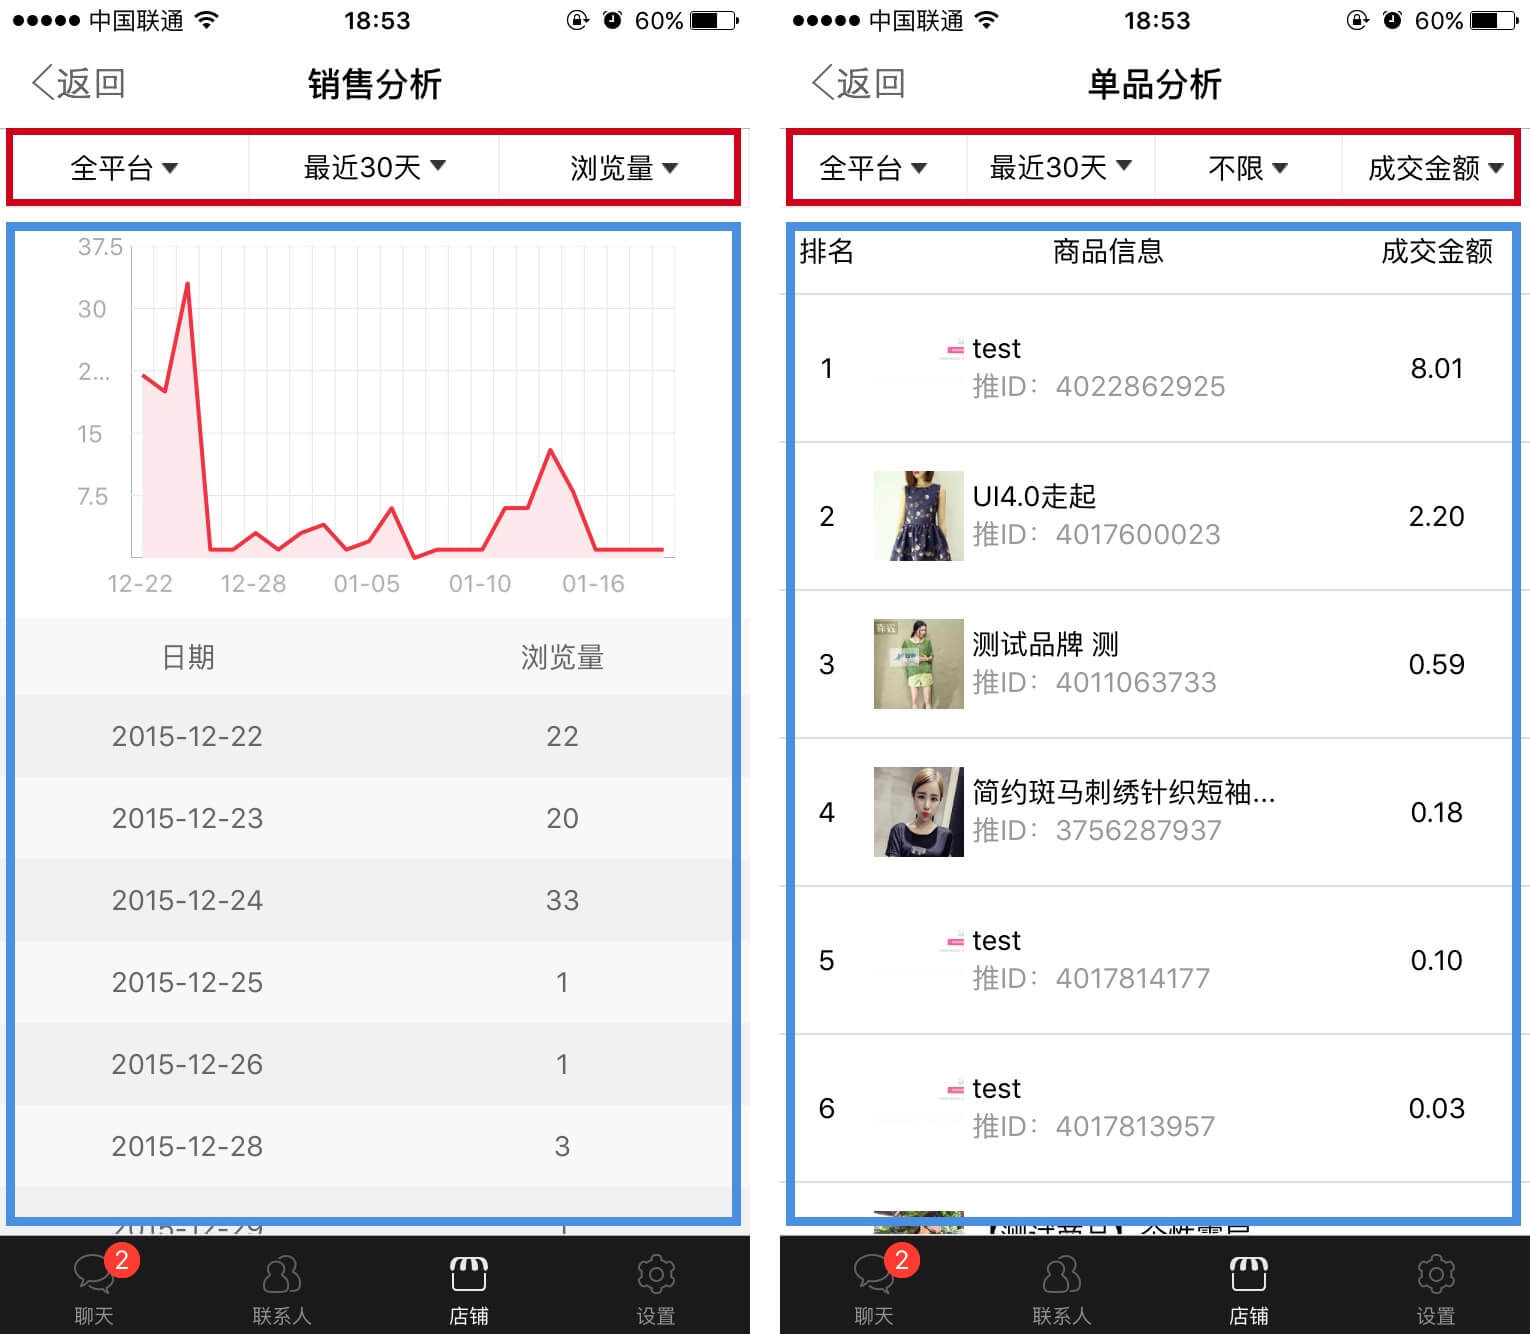
本周算是把一个 react native 版的商家管理工具(iOS 版花花内嵌商家后台)完成,所以现在花一点时间来把其中一些值得记录下的东西整理一下写出来。 根据 UI 设计,很多页面都采下图的展示方式:
可以看到,两个页面的结构相似:顶部都是若干个PickerIOS组件的集合(红色框部分),然后下面是不同的组件(蓝色框组件)。例如左图有3个PickerIOS而右图有4个PickerIOS,并且分别代表不同的筛选条件。左图中的内容组件包括一个图表以及一个列表,而右图只有一个列表。所以考虑把公共部分提取出一个公共组件,该组件可以实现:
- 红色框内的
PickerIOS数量以及内容可以定制。 - 蓝色框内的内容组件可以作为一个属性传递给该组件,用来展示信息。
- 切换筛选条件,能够向后端请求数据,并更新内容组件。
功能实现
顶部的Picker集合采用配置的方式实现,即单独创建一个配置文件模块DropdownViewConfig.js,文件内容大致如下:
|
1 2 3 4 5 6 7 8 9 10 11 12 13 14 15 16 17 18 19 20 21 22 23 24 25 26 27 28 29 30 31 32 33 |
/** * dropdown目录配置文件 * @author jzguo */ module.exports = { // 通用平台目录 platform: { // 顶部Dropdown目录集合 key: 'plat', // 用于数据请求参数key value: [{ pName: '', // 数据请求参数value name: '全平台', // 顶部Dropdown标题显示 },{ pName: 'pc', name: 'PC端', },{ pName: 'mob', name: '移动端', }], ajaxRequired: true, // 切换改drop时是否发送ajax请求,若非则仅切换不同展示字段 }, date: { key: 'type', value: [{ pName: 'week', name: '最近7天', },{ pName: 'month', name: '最近30天', }], ajaxRequired: true, }, } |
每个 key(如 platform 和 date 等)对应一种 Picker 类型;value object 中的 key 对应向后端请求数据时的params key,value 为每个 Picker 中的选项,pName 为向后端请求时 key 对应的 value 值,name 为 Picker 上展示的文字;ajaxRequired 用来指示该 Picker 选中状态发生变化时,是否需要向后端发送 ajax 请求,因为有的筛选是在已请求到的数据中进行,此时无需进行后端请求。
然后新建DropdownView.js模块,即本文要介绍的自定义容器组件。首先设置组件的state:
|
1 2 3 4 5 6 7 8 9 10 11 12 13 14 15 16 17 18 19 20 |
this.state = { pickers: [{ // 顶部Dropdown目录集合 key: '', // 用于数据请求参数key value: [{ pName: '', // 数据请求参数value name: '', // 顶部Dropdown标题显示 }] } ], curPickerIndex: 0, // 当前点击的Dropdown编号 selectedValues: [], // 当前每个Dropdown的selectedValue selectedTexts: [], // 对应上面每个selectedValue的标题内容 pickerHeight: new Animated.Value(1), reqData: {}, // 请求数据 dataType: '', // 当前展示的数据字段 dataTypeText: '', // 当前展示的数据字段名称 reqParams: {}, // 请求参数 newVal: '', // 暂存修改后的信息 newValText: '', } |
然后在挂载组件的时候,根据传来的dropMenus属性,从配置模块中找到对应的 Picker 选项来初始化 Picker 集合。
|
1 2 3 4 5 6 7 8 9 10 11 12 13 14 15 16 17 18 |
componentDidMount() { this.setState({ pickers: this.props.dropMenus, }, function () { var values = [], texts = []; const pickers = this.state.pickers; for (var i = 0; i < pickers.length; ++i) { values.push(pickers[i].value[0].pName); texts.push(pickers[i].value[0].name); } this.setState({ selectedValues: values, selectedTexts: texts, }, function() { (this.props.contentType == 'list') ? (this.setParams()) : (this.getData()); }); }); } |
然后还要写一些方法用来向后端请求数据的方法getData(),以及设置请求参数的方法setParams。 Picker 的值发生改变时,需要进行选项的状态处理;以及在关闭弹出的选择框后,需要执行筛选操作。
|
1 2 3 4 5 6 7 8 9 10 11 12 13 14 15 16 17 18 19 20 21 22 23 24 25 26 27 28 29 30 31 32 33 34 35 36 37 38 39 |
// 处理PickerIOS选择事件 handlePickerChanged(newVal) { // 鉴于state的特性不能直接修改,需要借助中间变量复制数组然后重新使用setState来修改状态 var curPickerIndex = this.state.curPickerIndex; var tempValues = _.clone(this.state.selectedValues), tempTexts = _.clone(this.state.selectedTexts); const newValText =getNameByPName(newVal, this.state.pickers[curPickerIndex].value); tempValues[curPickerIndex] = newVal; tempTexts[curPickerIndex] = newValText; this.setState({ selectedValues: tempValues, selectedTexts: tempTexts, newVal: newVal, newValText: newValText, }, function() { }); } // 不需要发送ajax请求的drop修改处理事件 // 通过修改state中的dataType,来改变传给子组件的props,然后在子组件中修改对应的state来刷新view _changeDataType(dataType, dataTypeText) { this.setState({ dataType: dataType, dataTypeText: dataTypeText, }); } closePicker() { if (this.state.pickers[this.state.curPickerIndex].ajaxRequired) { (this.props.contentType == 'list') ? (this.setParams()) : (this.getData()); } else { this._changeDataType(this.state.newVal, this.state.newValText); } Animated.timing( this.state.pickerHeight, {toValue: 1}, ).start(); } |
最后是render函数。
|
1 2 3 4 5 6 7 8 9 10 11 12 13 14 15 16 17 18 19 20 21 22 23 24 25 26 27 28 29 30 31 32 33 34 35 36 37 38 39 40 41 42 43 44 45 46 47 48 49 50 51 52 53 54 55 56 57 |
render() { var handleBtnPressed = this.handleBtnPressed, mSelf = this; var ContentView = this.props.content; return ( <View style={styles.container}> <View style={styles.btnGroup}>{ this.state.pickers.map(function (picker, index) { return ( <TouchableHighlight style={styles.btnGropuItem} underlayColor={'#f1f1f1'} onPress={handleBtnPressed.bind(mSelf, index)} > <View style={styles.btnGropuItemContainer}> <Text allowFontScaling={false}>{mSelf.state.selectedTexts[index]}</Text> <Image style={styles.btnGropuItemIcon} source={{uri: 'drop-arrow'}} /> </View> </TouchableHighlight> ) }) }</View> <ContentView style={styles.content} reqData={this.state.reqData} dataType={this.state.dataType} dataTypeText={this.state.dataTypeText} reqParams={this.state.reqParams} parents={this.props.parents || ''} /> <Animated.View style={[styles.picker, {height: this.state.pickerHeight}]}> <TouchableHighlight onPress={this.closePicker.bind(mSelf)} underlayColor={'#fff'} style={styles.completeChooseBtn}> <Text allowFontScaling={false} style={styles.completeChoose}>{'完成'}</Text> </TouchableHighlight> <PickerIOS onValueChange={this.handlePickerChanged.bind(this)} selectedValue={this.state.selectedValues[this.state.curPickerIndex]} >{ this.state.pickers[this.state.curPickerIndex].value.map(function (item, index) { return ( <PickerItemIOS label={item.name} value={item.pName} key={index} style={styles.pickerItem} /> ) }) } </PickerIOS> </Animated.View> </View> ) } |
最后在其他模块中引用上面定义的组件DropdownView,首先选择 Picker 配置,然后创建内容组件,最后嵌入DropdownView中。示例代码如下:
|
1 2 3 4 5 6 7 8 9 10 11 12 13 14 15 16 17 18 19 20 21 |
var DropdownView = require('./DropdownView'); var dropdownMenus = require('./DropdownViewConfig'); const dropMenus = [dropdownMenus.platform, dropdownMenus.date,]; var TableView = React.createClass({...}); class ShopView extends React.Component { render() { // contentType用来表示页面是ListView式还是chart型的,值分别对应'list'和'chart' return ( <DropView style={styles.container} reqParams={pageParams} content={TableView} dropMenus={dropMenus} contentType={'list'} > </DropView> ) } } |
以上就是主要的实现代码。
注:转载注明出处并联系作者,本文链接:https://nodefe.com/implementation-of-react-native-dropdown-container/


这竟然是JavaScript代码,跟安卓写界面似得,厉害
DropView
style={styles.container}
reqParams={pageParams}
content={TableView} content 是什么 没看到申明?
render 函数代码第6行: var ContentView = this.props.content;
我刚开始学习rn,我想问个问题,我自定义了一个view的A类,然后在另一个B类中 给这个view添加组件,添加不进去,始终展示的是A的view,
这是我A的render方法
render(){
return (
}
这是B中使用A的方法
render(){
已经解决
好的,不好意思刚看到
请问有完整的源码吗?
只是一个很简单的组件,看下思路自己很容易就能实现。当时我用的版本还是 0.14.1,现在都已经 0.40.0 了。