背景
来美丽说后做的第一个大的页面改版就是商家后台整个发宝页改版,感觉其中一个比较有意思的地方就是侧边导航栏的实现。页面内容非常多,涉及到商品的不同属性信息以及其他一些功能模块,所以整个页面的 js 实现也分模块组织。这次要记录的侧边导航就是sideNav.js这个模块。
页面效果
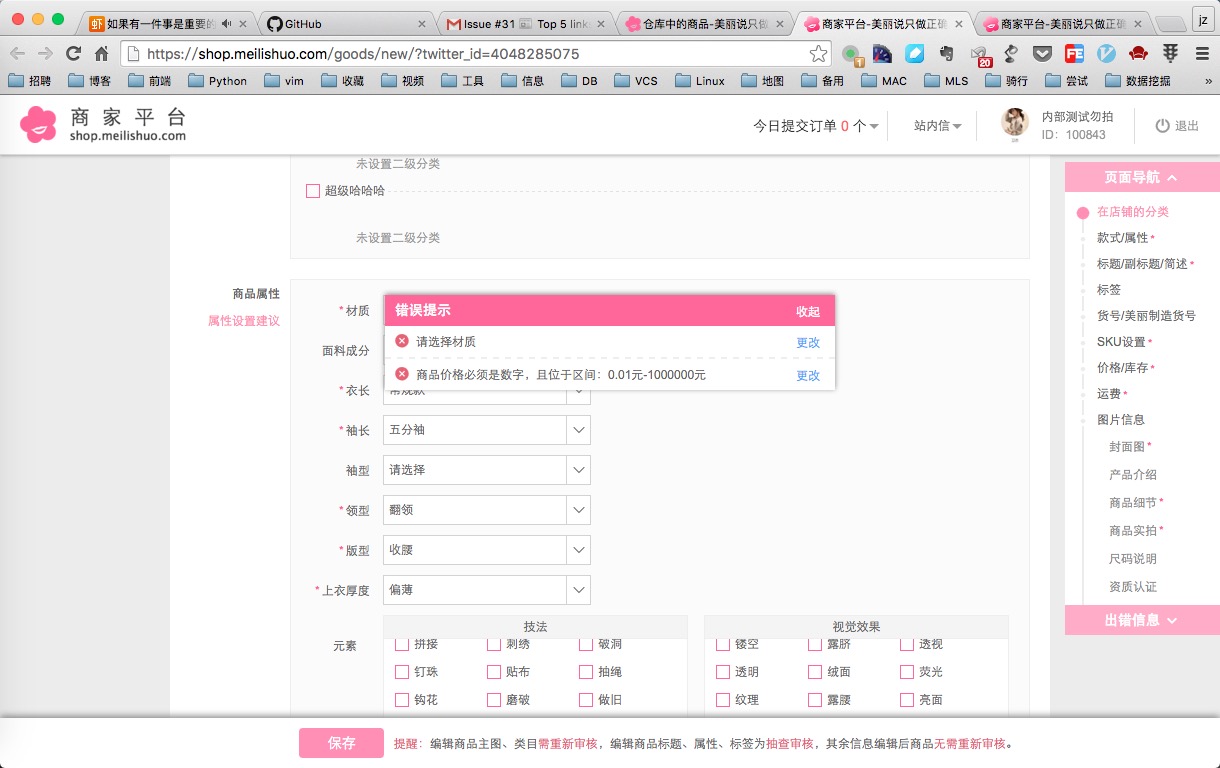
最终的效果如下图(如果有美丽说商家账号也可以直接访问该 链接 来看):
页面根据商品的不同属性信息划分为:在店铺的分类、款式/属性、标题/副标题/简述、货号/美丽制造货号、SKU设置、价格/库存、运费、图片信息和其他信息共8个大模块。其中图片信息模块下又分为封面图、产品介绍、商品细节、商品实拍、尺码说明、资质认证和店铺介绍工7个固定模块,以及可以动态添加或删除的自定义模块。现在侧边导航要实现的功能为:
- 点击侧边导航栏的不同选项,页面滚动到对应的功能区域。
- 根据页面当前滚动位置,高亮所在区域对应的侧边导航项;如果该项不在视野内,则滚动导航栏使该项移动至视野内。
- 点击添加或删除自定义模块后,能自动在导航栏中对应添加或删除对应导航项。
- 点击保存宝贝后,会进行信息校验;如果有错误,会在侧边导航中添加“出错信息”大项,并展示错误项,同样拥有定位功能。
- 点击“页面导航”或“出错信息”两个按钮会展开/折叠对应的导航面板。
代码实现
侧边导航栏的实现分为两部分:模板(HTML)和控制逻辑(JS)。
一、模板
模板的简化代码如下,主要用各标签的class和id表示不同的功能项。
|
1 2 3 4 5 6 7 8 9 10 11 12 13 14 15 16 17 18 19 20 21 22 23 24 25 26 27 28 29 30 31 32 33 34 35 36 37 38 39 40 41 42 43 44 45 46 47 48 49 50 51 52 53 54 55 56 57 58 59 60 61 62 63 64 65 66 67 68 69 70 |
<div class="floatBar"> <div class="floatBar-title"> 页面导航<span class="iconfont icon-up floatBar-title-btn"></span> </div> <div class="floatBar-content" id="floatBar"> <%* 有的商品没有款式,所以做兼容 *%> <% var mods = {}; var property_name = (this.goods.style_param && this.goods.style_param.length) ? 'custom_classify' : 'goods_property'; var mods = [{key: 'goods-category', title: '在店铺的分类', must:0}, {key: property_name, title:'款式/属性', must:1}, {key: 'goods_title_nav', title: '标题/副标题/简述', must:1}, {key: 'goods_tags', title:'标签', must:0}, {key: 'mod_mlzz', title:'货号/美丽制造货号', must:0}, {key: 'sku_set', title:'SKU设置', must:1}, {key: 'price', title: '价格/库存', must:1}, {key: 'freight', title:'运费', must:1}, {key: 'mod-pics', title:'图片信息', must:0}]; mods.forEach(function(item) {%> <div class="floatBar-content-item"> <div class="progressBar"> </div> <span class="icon iconfont icon-dot"></span><a href="javascript:void(0);" class="<%=item.key%>" data-cat-id="<%=item.key%>"><span class="item-title"><%=item.title%></span></a><%if(item.must){%><span class="must">*</span><%}%> </div> <%})%> <div class="child-nav-container" id="child-nav-container"> <div class="floatBar-content-item floatBar-content-detail-item first"> <a href="javascript:void(0);" data-cat-id="mod_gallery" class="mod_gallery">封面图</a><span class="must">*</span> </div> <%this.goods && this.goods.goods_detail && this.goods.goods_detail.forEach(function(item,index){%> <div class="floatBar-content-item floatBar-content-detail-item"> <a href="javascript:void(0);" data-cat-id="<%=item.key%>" class="<%=item.key%>" title="<%=item.title%>"><%=item.title%></a><%if(item.key=='detail_product_detail'||item.key=='detail_product_photos'){%><span class="must">*</span><%}%> </div> <%})%> </div> <div class="floatBar-content-item last"> <div class="progressBar"> </div> <span class="icon iconfont icon-dot"></span><a href="javascript:void(0);" class="goods_others" data-cat-id="goods_others"><span class="item-title">其他信息</span></a> </div> <div class="clear_f"> </div> </div> <div class="floatBar-title" style="display: none;"> 出错信息<span class="iconfont icon-down floatBar-title-btn"></span> </div> <div class="floatBar-content" id="floatBarErr" style="display: none;"> </div> </div> |
不同class表示的不同类型节点:
floatBar:整个侧边导航模块。floatBar-title:侧边导航不同模块的 title,比如本例就包括“页面导航”和“出错信息”。floatBar-content:侧边导航一个模块中的多个导航项容器。floatBar-content-item:导航项。child-nav-container:针对“图片信息”模块包含的子模块创建的容器。floatBar-content-detail-item:“图片信息”模块下子模块导航项。
其中每个导航项都有data-cat-id属性,值同该项的class值。不同id表示的不同节点:
floatBar:“页面导航”导航项容器。floatBarErr:“出错信息”导航项容器。child-nav-container:“图片信息”下导航项容器。
二、控制逻辑
代码模块组织采用类 AMD 规范,不详细介绍,本模块名为sideNav.js。模块内的一些全局变量如下:
|
1 2 3 4 5 6 7 8 9 10 11 12 13 14 15 16 17 18 |
// 当前导航所处的选项编号,用于仅当选项发生变化时再触发_changeActive() var curNavNo = -1; // 导航菜单容器 var floatBar = $('#floatBar'), floatBarErr = $('#floatBarErr'); // 导航部分可见高度范围 var viewMin = $('#floatBar').find('.floatBar-content-item:first-child').position().top, viewMax = $('#floatBar').outerHeight(true)-2; // 判断滚动到底部时需要减去的head目录高度 var headerHeight = $('.body div.head').height(); // 当前已展开导航项(导航/错误提示)索引,0为导航,1为测试 var curNavSpread = 0; var navsHeight = [floatBar.height(), '100%']; |
现在针对 页面效果 部分提出的几个功能点,分别展示代码。
1. 导航定位
|
1 2 3 4 5 6 7 8 9 10 11 12 13 14 15 16 17 18 19 20 21 22 23 24 25 26 27 28 29 30 31 32 33 34 35 36 37 38 39 40 41 42 43 44 45 46 47 |
/** * 点击右侧导航按钮后改变样式 * @param {obj} target 已点击按钮 * @return {none} */ var _changeActive = function(target) { var eleName = '.' + target; floatBar.find('a.color-pink').removeClass('color-pink').prev().removeClass('icon-circle color-pink').addClass('icon-dot'); floatBar.find(eleName).addClass('color-pink').prev().removeClass('icon-dot').addClass('icon-circle color-pink'); }; /** * 绑定错误导航项点击事件 */ var _bindErrorNavClick = function () { $('#floatBarErr').delegate('.floatBar-content-item', 'click', function (item) { $('#content').animate({scrollTop: $('#'+$(this).data('cat-id')).position().top}, 150); }) } /** * 绑定错误面板点击事件 */ var _bindErrorPanelClick = function () { $('#errPanel').delegate('.err-panel-item', 'click', function (item) { $('#content').animate({scrollTop: $(this).data('top')}, 150); $('#errPanel').hide(); }); }; /** * 绑定右侧导航定位事件 */ var bindNavClick = function() { floatBar.delegate('.floatBar-content-item a', 'click', function(e) { var eleId = $(this).data('cat-id'); $('#content').animate({scrollTop: $('#'+eleId).position().top}, 150); setTimeout(function(){_changeActive(eleId);}, 200); // IE9 hack 防止anchor的click触发beforeunload事件 return false; }); _bindErrorNavClick(); _bindErrorPanelClick(); }; |
主要就是实现滚动效果,以及_changeActive用来改变导航项的选中样式。
2. 滚动切换
该功能实现如下:
|
1 2 3 4 5 6 7 8 9 10 11 12 13 14 15 16 17 18 19 20 21 22 23 24 25 26 27 28 29 30 31 32 33 34 35 36 37 38 39 40 41 42 43 44 45 46 47 48 49 50 51 52 53 54 55 56 57 58 59 60 61 |
/** * 判断到达页面最底部改变导航颜色状态 */ var _arriveBottom = function (mods) { // 暂时去掉逐级判断 // for (var i = curNavNo + 1; i < mods.length; ++i) { // _changeStateAndMove(i, mods); // } _changeStateAndMove(mods.length-1, mods); }; /** * 改变导航项状态,并且视情况滚动右侧导航条使选中项移动至视野内 */ var _changeStateAndMove = function (index, mods) { _changeActive(mods[index]); curNavNo = index; var navItemTop = floatBar.find('.'+mods[index]).parent().position().top; // 40和478是导航部分可见高度范围 if (navItemTop < viewMin || navItemTop > viewMax) floatBar.animate({scrollTop: navItemTop-35}, 200); } /** * 绑定窗口滚动事件 */ var bindWindowScroll = function() { var mods = []; $.each(floatBar.find('.floatBar-content-item a'), function(index, item){ mods.push($(item).data('cat-id')); }); // 添加或删除模块时会重新绑定滚动事件,所以需要先取消之前绑定的事件 $('#content').unbind('scroll'); $('#content').scroll(function(e){ // 当前滚动位置 var curHeight = $(this).scrollTop(); // 容器总高度 var totalHeight = $('#content').find('div.add_goods').height(); if (curHeight + $(window).height() - headerHeight == totalHeight) { _arriveBottom(mods); return; } for (var i = 1; i < mods.length; ++i) { if (curHeight < $('#'+mods[i]).position().top-5) { if (curNavNo != i-1) {// 仅当区域发生切换时才改变导航项状态 _changeStateAndMove(i-1, mods); } break; } } if (i == mods.length && curNavNo != mods.length-1) { _changeStateAndMove(mods.length-1, mods); } }); }; |
3. 添加/删除导航项
这部分功能在自定义模块中实现,在本模块中不需要对自定义模块进行特殊处理,他们对应的导航项都是普通的导航项,只要添加在child-nav-container这个容器中即可。
4. 错误信息面板
刚进到页面时,“出错信心”这个导航模块是不展示的,只有当提交商品信息并出现校验错误,才会动态生成错误信息导航栏。
|
1 2 3 4 5 6 7 8 9 10 11 12 13 14 15 16 17 18 19 20 21 22 23 24 25 26 27 28 29 30 31 32 33 |
/** * 点击提交后清除已有错误导航 */ var _clearErr = function () { floatBarErr.children().remove(); floatBarErr.height(0); } /** * 初始化生成错误导航 */ var initError = function (errNav) { _clearErr(); var con = '#floatBarErr'; $.each($(errNav), function(index, item) { var el = $(shareTmp('add_err_nav', { option: {id: item.id, title: item.title} })).appendTo(con); }); // 尽在第一次提交时绑定标题点击事件 if (!floatBarErr.is(':visible')) { _bindTitleClick(); $('.floatBar').find('.floatBar-title:eq(1)').show(); floatBarErr.show(); } // 保证展开错误导航页 curNavSpread = 0; _changeRollUp(true); }; |
5. 导航模块切换
点击“页面导航”或“出错信息”两个导航模块的标题,可以展开/折叠对应模块,代码如下:
|
1 2 3 4 5 6 7 8 9 10 11 12 13 14 15 16 17 18 19 20 21 22 23 24 25 26 27 28 29 |
/** * 切换当前展开的导航区域 * @param isInit 初始化错误导航时调用为true,点击标题时为false,用于记录floatBar的高度 */ var _changeRollUp = function (isInit) { var navs = ['floatBar', 'floatBarErr']; var eleRollup = $('#'+navs[curNavSpread]), eleSpread = $('#'+navs[1-curNavSpread]); // 判断如果当前是导航区要折叠,要留白 var paddingVal = curNavSpread ? 0 : 2, paddingOri = curNavSpread ? 10 : 0; navsHeight[0] = isInit || curNavSpread ? navsHeight[0] : floatBar.height(); eleRollup.animate({height:0, paddingTop:paddingVal, paddingBottom:paddingVal}, 300); eleSpread.animate({height:navsHeight[1-curNavSpread], paddingTop:paddingOri, paddingBottom:paddingOri}, 300); eleRollup.prev().find('.floatBar-title-btn').removeClass('icon-up-big').addClass('icon-down-big'); eleSpread.prev().find('.floatBar-title-btn').removeClass('icon-down-big').addClass('icon-up-big'); curNavSpread = 1 - curNavSpread; }; /** * 点击导航标题切换展示区域 */ var _bindTitleClick = function () { $('.floatBar').delegate('.floatBar-title', 'click', function(e) { _changeRollUp(false); }) }; |
代码总结
以上就是主要的代码实现,最后只要将initError、bindNavClick、bindWindowScroll这三个方法作为模块接口暴露出去即可。代码没有充分考虑页面性能等因素,后续找时间再优化下。
注:转载注明出处并联系作者,本文链接:https://nodefe.com/js-dynamic-sidenav/

